
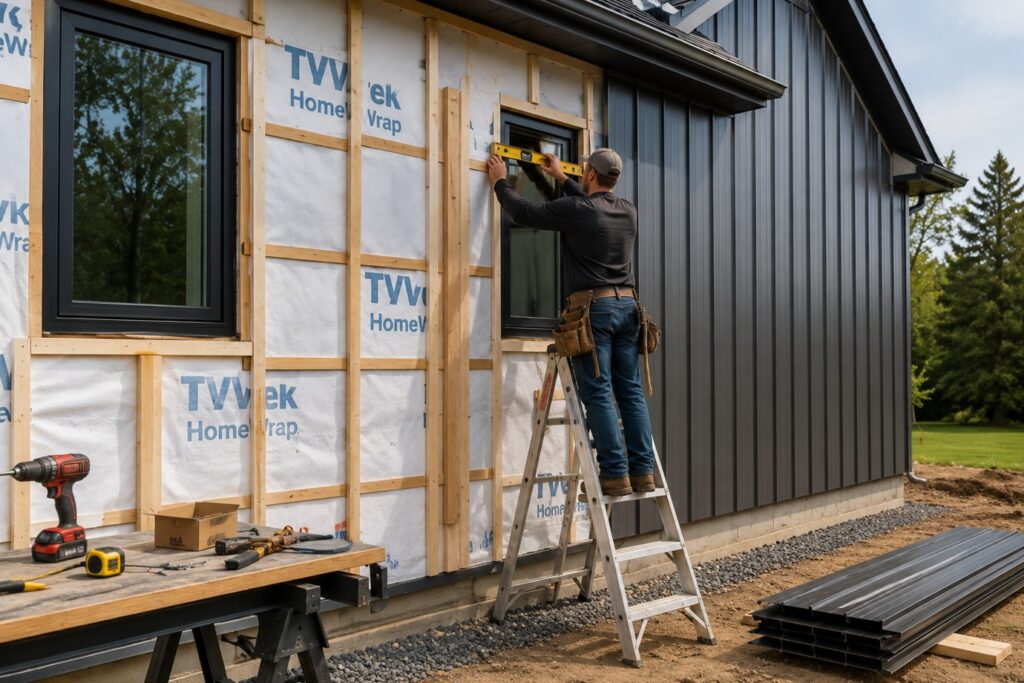
Installing new siding can completely change the appearance of a building, but much of the work that determines long-term performance happens before the first panel goes onto the wall. The condition of the substrate, moisture-management strategy, flashing, openings, insulation, and supporting framework can all influence how well the finished cladding performs.
This is particularly important with metal siding panels. Their long, straight profiles can make an exterior look clean and precise, but they can also reveal uneven substrates and poor alignment. Metal also expands and contracts as temperatures change, so fastening and detailing need to accommodate the requirements of the specific system.
For these reasons, exterior wall preparation should be treated as a major stage of the project rather than a quick task before installation.
The exact wall assembly varies according to the building, climate, panel manufacturer, local building requirements, and whether the project involves new construction or renovation. However, several fundamental preparation principles apply to most projects.
Start With the Complete Wall Assembly
Before removing old siding or ordering new panels, understand how the entire exterior wall is intended to work.
Siding is not normally the only layer protecting a building from weather. A typical wall may include interior finishes, framing, insulation, structural sheathing, an air or water control layer, furring or another attachment system, and exterior cladding.
Each component performs a different function.
The siding handles direct exposure to weather and provides the finished exterior appearance. Layers behind it help control bulk water, air movement, heat, and moisture.
This is why metal siding panels should not simply be installed over whatever surface happens to exist.
The complete assembly needs to be compatible, properly detailed, and appropriate for the building’s environment.
Review the Manufacturer’s Installation Instructions First
Metal siding products are not interchangeable.
Panel width, seam configuration, fastening method, attachment spacing, trim details, minimum substrate requirements, and allowances for thermal movement can vary significantly between systems.
Obtain the manufacturer’s current installation documentation before preparing the wall.
This allows you to determine what needs to be completed before installation day.
For example, one panel system may be designed for attachment to solid sheathing, while another may use a specific furring arrangement. Some products use exposed fasteners, while others use clips or concealed fastening systems.
Following the product-specific requirements also matters for warranties.
Do not assume that a method that worked with one metal siding product is automatically appropriate for another.
Inspect the Existing Exterior Carefully
Renovation projects should begin with a detailed inspection of the current wall.
Look for signs of water damage, rot, corrosion, insect activity, loose materials, cracked sheathing, failed sealants, damaged flashing, or movement around openings.
Pay particular attention to areas beneath windows, around doors, at roof-to-wall intersections, and near the bottom of exterior walls.
Staining can indicate previous water movement.
Soft or deteriorated materials may suggest that moisture has been entering the assembly for some time.
Installing new siding over unresolved damage does not solve the underlying problem. It simply makes the problem harder to access later.
Repair the cause of deterioration before covering the wall.
Decide Whether Existing Siding Should Be Removed
Homeowners sometimes ask whether metal panels can be installed directly over existing cladding.
The answer depends on the existing material, its condition, the proposed system, local requirements, and the manufacturer’s installation instructions.
Removing old siding has several advantages.
It exposes the underlying wall, allowing contractors to inspect sheathing, flashing, weather barriers, and structural conditions directly. It also makes it easier to correct uneven surfaces.
In some projects, an approved installation over existing materials may be possible when a suitable attachment system is used.
However, adding layers can affect window and door depths, flashing, trim, drainage, and wall thickness.
The decision should therefore be based on the complete wall design rather than convenience alone.
Repair Structural Problems Before Continuing
Siding should not be expected to correct structural defects.
If the wall has significant movement, damaged framing, deteriorated sheathing, or other structural concerns, these issues should be addressed first.
Loose or weakened substrates may not provide reliable support for fasteners.
Similarly, a wall that is noticeably out of plane can create visible problems once long metal panels are installed.
Where structural deterioration is suspected, have the wall assessed by an appropriately qualified professional.
It is usually far easier to complete necessary structural repairs while the exterior is open than after the new cladding has been installed.
Make Sure the Wall Is Flat and True
Metal siding tends to highlight irregularities.
Long vertical or horizontal lines make bows, dips, and uneven transitions relatively easy to see, particularly when sunlight strikes the panels from an angle.
Use appropriate tools to check the wall plane.
Look across sheathing joints and inspect corners, framing transitions, additions, and repaired sections.
Minor variations may be addressed through the specified furring or attachment system. More significant problems may require repairs to framing or sheathing.
Do not try to force rigid panels to compensate for a badly uneven wall.
Careful preparation produces straighter seams, cleaner corners, and a more professional finished appearance.
Inspect and Repair the Sheathing
Structural sheathing provides an important backing layer on many wall assemblies.
Before covering it, check that panels are securely attached and in suitable condition.
Replace sections that are rotten, badly damaged, delaminated, or otherwise unsuitable.
Look closely at penetrations and edges where previous leaks may have affected the material.
Any replacement work should use materials appropriate for the wall design and applicable building requirements.
Also confirm that sheathing fasteners and panel installation meet the requirements of the project.
Once the weather-control layers and metal siding are installed, accessing the sheathing becomes considerably more difficult.
Address Moisture Problems Before Closing the Wall
If you discover damp materials during preparation, do not immediately cover them.
First determine why moisture is present.
Possible sources include leaking windows, failed flashing, roof runoff, plumbing leaks, condensation, poor drainage, or defects in the previous siding system.
Repair the source and allow materials to dry as appropriate.
Covering an actively wet wall can trap a problem within the assembly.
Moisture management is especially important because metal itself does not absorb water. Any water that reaches the space behind the panels needs a planned path to drain and dry.
Install the Required Water-Resistive Barrier
Many exterior wall assemblies include a water-resistive barrier, often abbreviated as WRB, behind the cladding.
Its role is to provide a secondary drainage plane for water that gets past the exterior siding.
The specific product and installation method depend on the wall design, climate, and applicable codes.
Common options can include building wraps and certain membrane systems.
Installation details matter.
Seams, penetrations, transitions, corners, and openings need to be treated according to the selected system’s instructions.
The objective is not merely to cover the wall. The barrier needs to function continuously so water is directed outward rather than into vulnerable parts of the assembly.
Think in Terms of Drainage, Not Just Sealing
Exterior walls should be designed with the expectation that some water may eventually get behind the primary cladding.
Trying to seal every possible opening indefinitely is rarely a complete moisture-management strategy.
Instead, the wall should provide a way for incidental water to move downward and escape.
This is where proper layering becomes critical.
Flashing and water-control materials should generally work in a shingle-like sequence so upper layers direct water over lower layers.
Poor sequencing can direct water behind the weather barrier instead.
Always follow the details required by the wall system and manufacturer.
Flash Windows Before Installing Siding
Windows are among the most important areas to address during wall preparation.
Water can collect around window heads, jambs, and sills if flashing is incomplete or poorly integrated.
Check existing windows for signs of leakage or deterioration.
New and replacement windows should be integrated with the wall’s water-management system using compatible flashing materials and appropriate sequencing.
Head flashing or drip caps may be required depending on the window and cladding design.
Do not rely on exterior sealant alone as the primary method of preventing water intrusion.
Sealants are useful components, but effective window detailing generally combines flashing, drainage, and carefully planned transitions.
Prepare Door Openings the Same Way
Exterior doors require similar attention.
Inspect thresholds, jambs, heads, and surrounding sheathing.
Look for evidence of previous leaks, especially at patio doors and other large openings exposed to wind-driven rain.
Door flashing needs to integrate correctly with the surrounding weather barrier and siding trim.
Also consider how the increased wall thickness created by furring and metal siding will affect the finished depth around the door.
Planning these transitions before panel installation makes it much easier to create clean, weather-resistant details.
Pay Special Attention to Roof-to-Wall Intersections
Where a lower roof meets a vertical wall, water management becomes particularly important.
Rainwater running down the roof needs to be directed away from the wall assembly.
Existing step flashing, kick-out flashing, and other details should be inspected and corrected where necessary before new siding covers the area.
These intersections can become vulnerable when siding contractors and roofing contractors treat their work as completely separate systems.
In reality, the two need to work together.
If flashing at a roof-wall connection is incorrect, new siding will not compensate for it.
Check the Bottom of the Wall
The lower edge of the siding requires careful planning.
Metal panels should terminate according to the manufacturer’s required clearances and trim details.
Consider the relationship between the siding and finished grade, patios, decks, driveways, and landscaping.
Water should be able to drain away rather than collect against the wall.
Soil, mulch, vegetation, or paving should not unintentionally block drainage paths.
If the design includes a rainscreen cavity or furring, the base detail may also need an appropriate drainage opening and insect-management solution.
Plan this detail before setting the first panel because it establishes the starting line for the entire installation.
Consider a Rainscreen Approach
Many modern wall assemblies use a drainage and ventilation space behind the exterior cladding.
This is commonly created using furring strips or another approved rainscreen system.
The gap can help water drain and provide some opportunity for drying behind the siding.
The appropriate cavity depth, furring material, orientation, fastening, and ventilation details depend on the wall assembly and local requirements.
Metal siding installed vertically may require a different furring arrangement from horizontally installed panels.
Some projects use cross-furring to create both the required attachment direction and a continuous drainage path.
Do not improvise the arrangement. Follow the cladding manufacturer’s requirements and the project’s wall design.
Plan Furring Around the Panel Direction
Panel orientation affects more than appearance.
Vertical metal siding creates strong lines that can make a building appear taller. Horizontal panels can emphasise width.
The direction also affects how panels attach to the wall.
Furring typically needs to provide appropriate support across the direction required by the siding system.
If furring interrupts vertical drainage, additional detailing may be necessary to maintain water movement behind the cladding.
This is another reason to finalise the siding profile and orientation before wall preparation begins.
Changing from horizontal to vertical panels halfway through preparation may require significant changes to the supporting system.
Consider Exterior Insulation Before Installing the Panels
Siding replacement can be an opportunity to improve the thermal performance of an exterior wall.
Some renovation projects incorporate continuous exterior insulation before the new cladding is installed.
This can reduce thermal bridging through framing and potentially improve overall wall performance.
However, adding exterior insulation changes several details.
Fastener length, furring attachment, window depths, door transitions, roof intersections, exterior outlets, and trim all need to accommodate the increased wall thickness.
Structural attachment of the siding system must also remain adequate.
If exterior insulation is part of the project, it should be designed as part of the complete wall assembly rather than added as an afterthought.
Plan for Air Sealing Where Appropriate
When existing siding is removed, previously hidden gaps and penetrations may become accessible.
Depending on the building design, this can provide an opportunity to improve exterior air-control details.
Potential leakage locations can occur around utility penetrations, window and door openings, transitions between materials, and other joints.
The appropriate air-control strategy depends on the building.
Do not simply apply random sealant wherever a gap appears.
Air barriers work best when they are treated as continuous systems with planned connections between walls, foundations, roofs, windows, and other components.
For substantial energy-efficiency renovations, professional building-envelope advice can be worthwhile.
Map Every Exterior Penetration
Before installing metal siding panels, identify everything that passes through the wall.
This can include electrical outlets, exterior lights, hose connections, vents, pipes, cables, security cameras, heat-pump lines, and other services.
Each penetration needs an appropriate water-management detail.
It may also require a mounting block or other support so equipment is not awkwardly attached through unsupported siding.
Planning these locations in advance helps avoid cutting unnecessary holes in finished panels later.
If exterior lighting or other equipment will be replaced during the renovation, coordinate the work before the siding installation begins.
Coordinate Electrical and Mechanical Work
Metal siding installation often overlaps with other trades.
Electricians may need to relocate fixtures. HVAC contractors may need access to vents or exterior equipment. Plumbers may need to adjust hose connections or pipe penetrations.
Schedule this work logically.
It is inefficient to complete beautiful new siding only to have another contractor remove panels or cut additional openings a week later.
Make sure everyone understands the finished wall thickness and planned mounting details.
Good trade coordination reduces damage and produces cleaner penetrations.
Prepare Corners Carefully
Exterior and interior corners are highly visible on metal-clad buildings.
The substrate needs to be straight so corner trim sits cleanly.
Check corners for plumb and correct any significant irregularities before installation.
Determine which trim system will be used and how it interacts with the panels, furring, and weather barrier.
Some systems use prominent corner pieces, while others create more minimal transitions.
Whatever the design, corner details should be established before panel layout begins.
Trying to solve them after most of the wall has already been covered can lead to awkward cuts and inconsistent spacing.
Establish Accurate Reference Lines
Do not assume the foundation, soffit, window head, or existing siding line is perfectly level.
Before installing panels, establish reliable reference lines.
For vertical siding, the first panel must be accurately plumb because small errors can become increasingly noticeable as installation progresses across the wall.
For horizontal systems, starting level is equally important.
Laser levels, chalk lines, and careful measurements can help establish consistent references.
Also measure the wall at several locations.
Buildings, particularly older ones, are not always perfectly square. Identifying these variations early allows installers to decide where adjustments will be least noticeable.
Plan the Panel Layout Before Cutting
Panel layout has a major effect on appearance.
Measure each elevation and determine where seams, ribs, or battens will fall in relation to windows, doors, corners, and other features.
Avoid ending with an extremely narrow panel at a prominent corner if the layout can be adjusted beforehand.
On highly visible elevations, designers may align panel seams with window edges or other architectural elements to create a more intentional rhythm.
Complex walls may benefit from a drawn elevation showing panel positions before installation.
The extra planning can reduce waste and improve visual consistency.
Allow for Thermal Movement
Metal expands when heated and contracts when temperatures fall.
The amount of movement depends on material, panel length, colour, temperature range, and system design.
Long panels and dark finishes exposed to direct sunlight can experience noticeable temperature changes.
Metal siding systems account for movement through their fastening and joint details.
Installers must follow the manufacturer’s requirements regarding fastener placement, clip systems, slotting, clearances, and panel engagement.
Over-tightening fasteners or restricting movement can contribute to distortion or other performance problems.
Never substitute generic fastening practices for product-specific instructions.
Select Compatible Fasteners
Fasteners are small compared with siding panels, but they are structurally and visually important.
Use the type, size, material, and corrosion resistance specified for the system and environment.
Compatibility matters because dissimilar metals can sometimes contribute to galvanic corrosion under suitable conditions.
Coastal environments may impose additional corrosion demands.
Fasteners also need sufficient penetration into the required structural substrate.
If exterior insulation or thick furring has been added, the attachment design may need to account for the greater distance between the siding and structural framing.
Do not choose fasteners based solely on what happens to be available on site.
Check Compatibility Between Materials
Metal siding may come into contact with flashing, fasteners, treated lumber, sealants, membranes, and other construction products.
These materials need to be compatible.
Certain chemical treatments or combinations of dissimilar metals can increase corrosion risk.
Some sealants may not adhere properly to particular factory-applied coatings.
Membrane manufacturers may also have specific requirements regarding primers or compatible flashing tapes.
When in doubt, consult technical documentation from the manufacturers involved.
Testing compatibility before installation is much easier than addressing staining, failed adhesion, or corrosion later.
Plan Flashing Before the Panels Arrive
Flashing should not be improvised from leftover material after siding installation has begun.
Identify all locations that require flashing and trim.
These may include windows, doors, wall bases, parapets, roof intersections, horizontal transitions, corners, penetrations, and material changes.
Determine how each piece integrates with the weather barrier.
The sequence matters.
Flashing should direct water toward the exterior and maintain continuity with surrounding drainage layers.
Complex architectural details may require custom-fabricated metal components, so measurements and ordering should happen early enough to avoid delaying installation.
Store Metal Panels Correctly
Wall preparation includes preparing an appropriate location for delivered materials.
Metal panels can be scratched, dented, bent, or stained if handled and stored carelessly.
Follow the manufacturer’s storage requirements.
Panels may need to be kept dry, elevated, supported correctly, and protected from construction traffic.
Avoid dragging panels across one another.
If protective films are applied, follow instructions regarding when they should be removed.
A panel damaged before installation may remain visually noticeable for the entire service life of the siding.
Protect the Rest of the Property
Siding preparation can generate debris, sharp metal edges, old fasteners, dust, and construction traffic.
Plan how landscaping, windows, doors, decks, paving, and neighbouring surfaces will be protected.
Establish a designated cutting area.
Metal offcuts can be extremely sharp and should not be left around paths, lawns, or driveways.
If cutting methods produce hot metal particles, take precautions to protect nearby finished surfaces and follow the panel manufacturer’s recommendations.
Good site organisation improves both safety and installation efficiency.
Check Weather Conditions Before Installation
Exterior preparation should account for weather.
Water-control layers should not be left exposed beyond their permitted exposure period.
Wet or icy conditions can also create safety risks and make some installation tasks more difficult.
Sealants, tapes, coatings, and membranes may have minimum or maximum application temperatures.
Wind can make handling long metal panels particularly challenging.
Check forecasts and product limitations before beginning each stage.
The goal is not simply to finish quickly but to install each component under conditions that allow it to perform as intended.
Complete a Final Pre-Installation Inspection
Before the first metal panel goes up, inspect the prepared wall one more time.
Confirm that damaged sheathing has been repaired.
Check that the water-resistive barrier is continuous and correctly integrated with openings and flashings.
Verify that furring is straight, secure, and arranged according to the siding requirements.
Confirm that windows, doors, penetrations, and roof intersections are properly detailed.
Check reference lines and panel layout.
Make sure necessary trims and accessories are available.
This final inspection is much easier than discovering a missing flashing detail after several rows of siding have already been installed.
Common Preparation Mistakes to Avoid
Several shortcuts can create problems later.
Installing over hidden rot is one of the most serious. Another is assuming that new siding will make an uneven wall look straight.
Poorly integrated window flashing can allow water into the assembly, while incorrect furring can interfere with drainage or panel attachment.
Using incompatible fasteners or restricting thermal movement can also affect long-term performance.
Other common problems include failing to plan penetrations, overlooking roof-to-wall flashing, allowing landscaping to block drainage, and beginning installation without an accurate panel layout.
Most of these issues are easier and less expensive to prevent than to repair after completion.
When to Bring in a Professional
Some homeowners may be comfortable handling portions of siding preparation themselves, particularly on simple buildings.
However, professional help can be valuable when the project involves structural damage, complex flashing, exterior insulation, multiple roof intersections, tall elevations, extensive water damage, or complicated architectural details.
Metal panel installation itself also requires careful measuring, cutting, handling, fastening, and trim work.
A contractor experienced with the specific system can help ensure that preparation matches the panel manufacturer’s requirements.
For structural or building-envelope concerns, additional specialist advice may be appropriate.
Final Thoughts
Successful metal siding begins long before the finished panels become visible.
The wall behind the cladding needs to be sound, reasonably flat, appropriately protected from water, and prepared for the specific attachment system being used. Windows, doors, roof intersections, penetrations, corners, and wall bases all require careful detailing before they disappear behind the new exterior.
Installing metal siding panels over a poorly prepared wall may produce a fresh appearance temporarily, but it can leave moisture, alignment, corrosion, or attachment problems hidden underneath.
A better approach is to treat preparation as part of the siding system itself.
Inspect and repair the existing structure first. Establish a continuous moisture-management strategy. Coordinate flashing, furring, insulation, services, and panel layout. Use compatible materials and follow the panel manufacturer’s instructions for fastening and thermal movement.
The preparation stage may not provide the dramatic visual transformation that comes when the final panels are installed, but it is what gives that transformation a solid foundation. Done correctly, it helps create a metal-clad exterior that looks precise, manages weather effectively, and is positioned to perform reliably for years to come.